GoのcliツールUIライブラリを試す ~ 今日のGithub Trending ~
今日のGithub Trending
カリスマエンジニアになりたい!!
そう願う大学二年生の私は新たな企画を始めます\(^o^)/
題して、 >>今日のGithub Trending<<
Github Trendingを眺めて、面白そうなリポジトリがあったらガンガン試していきます。
Github Trendingとは、盛り上がってるリポジトリを探すことが出来るというGithubが提供するサービスです。
第一回のリポジトリは、今日だけで200スター以上ついているmarcusolsson/tui-goを試していこうと思います!!

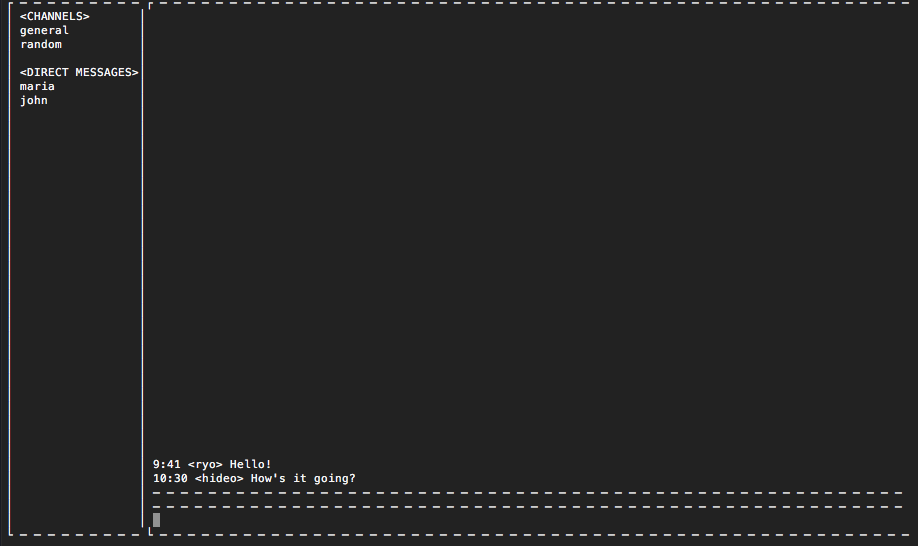
チャットクライアント風なcliツールを作ってみる
完成図

実装
基本的に以下の2つの構造体を使って作っていきます。
box.go
ボックスはウィジェットを水平または垂直に配置するためのレイアウトです。 もし 水平にすると、すべてのウィジェットは同じ高さになります。 縦にすると、すべて同じ幅になります。
// Box is a layout for placing widgets either horizontally or vertically. If
// horizontally, all widgets will have the same height. If vertically, they
// will all have the same width.
type Box struct {
    WidgetBase

    children []Widget

    border bool
    title  string

    alignment Alignment
}
entry.go
エントリは、1行のテキストエディタです。 これによってユーザはアプリケーションにテキストを供給することができます。例えば、ユーザおよびパスワード情報を入力することができます。
// Entry is a one-line text editor. It lets the user supply the application
// with text, e.g., to input user and password information.
type Entry struct {
    WidgetBase

    text string

    onTextChange func(*Entry)
    onSubmit     func(*Entry)
}
サイドバー作成
sidebar := tui.NewVBox(
    tui.NewLabel(" <CHANNELS>"),
    tui.NewLabel(" general"),
    tui.NewLabel(" random"),
    tui.NewLabel(""),
    tui.NewLabel(" <DIRECT MESSAGES>"),
    tui.NewLabel(" maria"),
    tui.NewLabel(" john"),
    tui.NewSpacer(),
)
sidebar.SetBorder(true)
- NewVBox関数で、縦方向のBoxを作成できます。
- 任意数のWidgetを与えることが出来ます。
- SetBorderメソッドで枠を表示するかを決めます。
送信済みメッセージを表示
type post struct {
    username string
    message  string
    time     string
}

// 送信済みPostのスライス
var posts = []post{
    {username: "ryo", message: "Hello!", time: "14:41"},
}

history := tui.NewVBox()
history.SetBorder(true)
history.Append(tui.NewSpacer())

for _, m := range posts {
    history.Append(tui.NewHBox(
        tui.NewLabel(m.time),
        tui.NewPadder(1, 0, tui.NewLabel(fmt.Sprintf("<%s>", m.username))),
        tui.NewLabel(m.message),
        tui.NewSpacer(),
    ))
}
NewVBox関数で縦方向のBoxを作成し、Appendメソッドでメッセージを追加していきます。
Appendメソッドの実装を覗いてみましょう。
box.go
// Append adds the given widget at the end of the Box.
func (b *Box) Append(w Widget) {
    b.children = append(b.children, w)
}
Appendメソッドは、Widgetインターフェイスの値をBoxのchildrenというスライスに追加していきます。
入力ボックス作成
input := tui.NewEntry()
input.SetFocused(true)
input.SetSizePolicy(tui.Expanding, tui.Maximum)

inputBox := tui.NewHBox(input)
inputBox.SetBorder(true)
inputBox.SetSizePolicy(tui.Expanding, tui.Maximum)
Entry構造体を作ってNewHBoxの引数に渡すことで、Entry構造体を子要素として持ったBoxを作ることが出来ます。
NewHBoxメソッドの実装を覗いてみましょう。
box.go
// NewHBox returns a new horizontally aligned Box.
func NewHBox(c ...Widget) *Box {
    return &Box{
        children:  c,
        alignment: Horizontal,
    }
}
NewHBox関数はWidgetインターフェイスを子要素に含めることが出来ます。
そのためBox構造体だけではなく、Widgetインターフェイスが実装されているEntry構造体も渡すことができます。
投稿する
import "flag"
var name = flag.String("u", "kazuki", "Set your name")
flag.Parse()

input.OnSubmit(func(e *tui.Entry) {
    history.Append(tui.NewHBox(
        tui.NewLabel(time.Now().Format("15:04")),
        tui.NewPadder(1, 0, tui.NewLabel(fmt.Sprintf("<%s>", *name))),
        tui.NewLabel(e.Text()),
        tui.NewSpacer(),
    ))
    input.SetText("")
})
Entry構造体のOnSubmitメソッドで、Enterを押した時の挙動を設定出来ます。
historyにメッセージを追加します。
flagパッケージを使用して、実行時にユーザー名を指定出来るようにします。
UI作成
chat := tui.NewVBox(history, inputBox)
chat.SetSizePolicy(tui.Expanding, tui.Expanding)

root := tui.NewHBox(sidebar, chat)

ui := tui.New(root)
ui.SetKeybinding("Esc", func() { ui.Quit() })
- Boxの、Widgetインターフェイスを子要素に出来る機能を利用して、今まで作成したBoxをrootにまとめていきます。
- tcellUI構造体を作成し、Esc押下時にuiを終了するよう、キーバインディングを設定します。
実行
if err := ui.Run(); err != nil {
    panic(err)
}
Runメソッドを覗いてみましょう。
ui_tcell.go
func (ui *tcellUI) Run() error {
    if err := ui.screen.Init(); err != nil {
        return err
    }

    if w := ui.kbFocus.chain.FocusDefault(); w != nil {
        w.SetFocused(true)
        ui.kbFocus.focusedWidget = w
    }

    ui.screen.SetStyle(tcell.StyleDefault)
    ui.screen.EnableMouse()
    ui.screen.Clear()

    go func() {
        for {
            switch ev := ui.screen.PollEvent().(type) {
            case *tcell.EventKey:
                ui.handleKeyEvent(ev)
            case *tcell.EventMouse:
                ui.handleMouseEvent(ev)
            case *tcell.EventResize:
                ui.handleResizeEvent(ev)
            }
        }
    }()

    for {
        select {
        case <-ui.quit:
            return nil
        case ev := <-ui.eventQueue:
            ui.handleEvent(ev)
        }
    }
}
- 別ゴルーチンを立ててPollEventメソッドを呼ぶことで、イベント発生を監視します。
- イベントを検知したら、eventQueueというチャネルにenqueueしていきます。
- eventQueueの状態をメインゴルーチンで監視し、受信を確認したら実行します。
*PollEventはgdamore/tcellという別パッケージのメソッドです。
コード全貌
長くなるのでGIstに記載しました。
https://gist.github.com/ryonakao/6247637a39f32ba0543f5b0421297357
まとめ
評価されてるライブラリを試すことで以下のメリットがあることに気づきました。
- コードを多読することになるため、コーディングスキルがUP(今回は、marcusolssonさんのinterface設計がとても勉強になりました。)
- OSS界隈での需要が分かる
- ワクワクする
また時間があったらやってみたいと思います!!